Wednesday, 25 April 2012

Flowery Bubbles!


For my independent project, in the half term I made a pair of  bubble shorts. After I made these I decided to make them again in another fabric, the second time round it only took me half the time to make them which was about 5/6 hours.

I changed the waist band as I didn't like the effect the elastic had, I also made the shorts a little bit shorter.
Not sure if you can see but I still have some stitches left to unpick.


Here is how I would wear these,I kept the top simple as there's a lot of texture and pattern already in the shorts I also made a Usamimi headband out of the extra fabric and I wore a pair of dolly shoes with a similar pattern that I thought looked pretty cute.

 There's been alot of bad press about bubble shorts but I think that if you get the right style and fabric they can look pretty good.


Thanks for reading!
What do you guy think about my bubble shorts??

Jenny xxx


Tuesday, 24 April 2012

Some more Fashion Illustrators


For his brief I have had to look at more illustrators so that I can test more techniques to create my own illustrating style. 

Here are some of my favourite illustrators from the new ones I have found :

Max Gregor is one of my favourite Illustrator that I have researched the second time round, I really like the bright colours that he uses and how he mixes paint with pencil.


This Illustration is my favourite of his work, I definitely want to recreate this piece for college or just for  me!

Nadia Flower is also a favourite of mine, I really love the colours and shapes she uses 


 I haven't researched into Bec Winnel as I already have enough illustrators and to be honest I would be quite scared to even try to recreate her work as its so detailed and realistic, it would take me months to even try!

However I think that so far out of all the illustrators I have researched she is my all time favourite illustrator. 

You can Download a free poster of this illustration at the bottom of the page here, I definitely want one!!


All images are from Illustration web 

Thanks for reading! What do you think of these Illustrators?

Jenny xxx

Monday, 23 April 2012

Colour Page


For college to create our final dresses I have to create a colour page using relevant images to our theme and to choose a number of colours that I want to use for my final piece.  

So this is the page that I have Created so far: 


These probably wont be the final colour page as I ted to change my mind a lot with these kind of things.

Thanks for reading! What do you think of my colour page?

Jenny xxx


Sunday, 22 April 2012

Kanzashi Flowers

Kanzashi Flowers are the hair ornaments that used in traditional Japanese hairstyles, I've already said in a previous post how I got to Geisha's Hair pieces in mu sketch book thread here.

I found that they have seasonal kanzashi flowers and different types of kanzashi such as the Bira-bira, Kogai, Kanoko Dome, Tsumami Kanzashi.

I had a go at making Tsumami Kanzashi which literally means 'folded fabric hair ornament'. Tsumami kanzashi are made from mall squares of silk which are folded into petals using origami techniques. These flowers can have anywhere from 5 to 75 petals, for these I only used 5 petals, I also used different fabrics for each flower to see which fabric works best, out of the fabrics I tried the Georgette worked best, I found that chiffon was way too light to hold its shape well and the lace I used was too rough and stiff.

The kanzashi that I made would be most likely be worn in April, these include soft pink cherry blossom (sakura) usually mixed with butterflies and bonbori lanterns, signalling the approach of summer.


Thanks for reading! What do you think about my Kanzashi flowers??

Jenny xxx

Tuesday, 17 April 2012

Viktor and Rolf

Lately in my work I have been looking at what was considered feminine in different decades, one style that I looked at was Georgian clothes.
In this decade I concentrated mostly on the embellishments for this era, Ruffles and bows where quite popular embellishments for both women and men, After I did this research I found designers 'Viktor and Rolf' In their collection 'Flowerbomb' half of this collection was in pink, red and neutral tones however the other half of the collection was in black.

Haute runway theatrics from Viktor & Rolf's Flowerbomb fragrance launch in 2004

The image above is the coloured half of the collection, as you can see almost every outfit is embellished with at least a piece of ribbon or a bow (its like looking at pink heaven!) a lot of these models seem to look gift wrapped.
These are some of my favourite pieces from this half of the collection:


Unfortunately I couldn't get hold of a group picture of the black collection but all of the models are wearing biker helmets and remind me of the dark side of spider man(venom!)
This whole collection appears to give a good and evil kind of vibe the good being quite girly and preppy, the bad quite dark and edgy.
Here are some of my favourite pieces from the black pieces


Thanks for reading!
What do you think of this collection??

Jenny xxx

Monday, 9 April 2012

Craft Fair At the NEC, Birmingham

The other weekend me and my friend Jess( Check out her blog )  went to a craft fair at the NEC in Birmingham, this post is a little late but this was the first big craft fair I've been to so I thought I would share some pictures and some of the stuff I bought.


Me and Jess on the left, I had a few (lest say funky) complements on the tights I wore from (lets say funky) men.


We started in the hobby crafts section however there wasn't much of great interest in there other than the origami and the cake decorating stalls so we headed to the sewing section.


There were loads of beads and different bead stalls

This dress was made from paper


These dresses were from Downton Abbey

Here are the things that I bought at the NEC, In the image above -
Fancy zip - £2
Round nose pliers - £4
Fat quarter(floral fabric) - £2
2 packs of bells!! (been looking for these for months) - 50p per pack

I also bought 3meters of fabric the blue fabric was £6.50 a meter and the other 2 were £5 a meter

And finally I bought some patterns, I bought this set as I've always wanted to make a Chinese dress so now when I have time I can!

Thanks for reading! I hope you enjoyed this post!

Have you ever been to a craft fair??

Jenny xxx

Wednesday, 4 April 2012

Independent Project : Bubble shorts

For pattern cutting we have a choice of doing an independent project to help get a distinction, so for my independent project I decided to make some bubble shorts.


I first saw K.L wearing these in her 5 OOTD: I wear a weapon..or Two + Jewelmint Giveaway!!!  video and I really wanted a pair!! She said they were from yesstyle so I went on their website and I couldnt find them! So I decided to make them, also now that I have the patterns and the know how I can make more in different fabrics.


So here's how I made the shorts :


First I started by tracing around a trouser block, or in my case a long short pattern block thing? this already had a 1cm seam allowance so I drew that in.


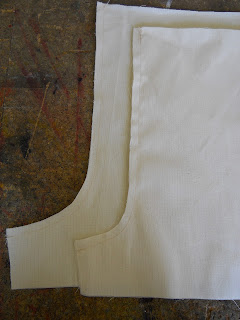
After that I drew my design lines, about 4cm below the seam and then I added a 1cm seam allowance on the end of that I also drew in the darts and added the grain line.


I then traced over my first draft up to my design lines with the 1cm seam allowance and then I cut these out, as I used an elastic waist band I scribled the darts out and then I had my finished lining patterns.


Then I traced over my first draft on another piece of paper without the seam allowance, I also shortened the patterns as the first draft were a bit too long. I then divided the pattern pieced into 3 equal sections and labeled each piece 1,2,3,4,5 and 6 and cut these out.

 
I took a new piece of paper and drew a line some where in the middle from one end of the paper to the other. I then placed th epieces in order 6cm distance from each other matching the hipline to the line I drew before, then I taped these down and filled in the gaps.


I traced over my adapted pieces and added a 1cm seam allowance and grain line and then cut these out and I had finished my patterns.

I then did a lay plan to see how much fabric I needed, I found that I needed 1 1/2m of fabric, So I got my fabric and then pinned down my patterns and cut them out.


I started with my lining pieces and sewed the 2 fronts together and 2 backs together down the curved seam and then I presses the seams open. I then placed the fromt and back pieces right together and sewed down the sides. 


I then sewed the pieces together at the crotch and pressed the seam open.

I then did exactly the same with the outer pieces.

 
After that I gathered the waist on the outer piece to match the width of the lining fabric and the same with the leg holes.

 
My pieces didn't match at the leg holes, to fix this I lined the patterns together and cut off the extra, then I cut off the extra on the fabric.

 
 I then sewed the shorts to the lining at the leg holes, this is was very confusing and I did have to un pick one leg and cut my self in the process, to do this I basically put the shorts together how they would be if they were sewn together and then turned them so that I could sew them.


 After that I sewed the lining and the outer shell together at the waist.


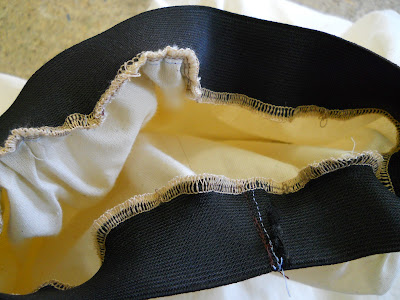
 Then I sewed on the waist band which was just an elastic, to do this I sewed the ends together and pinned the elastic whilst stretching it to pin it I then overlocked the elastic to the shorts making sure the edge of the fabric was almost touching the blade. When I did this I should have stretched the elastic a bit more.


I then tried them on and found that they would look better if the seam from the elastic was stitched on top to give a nicer finish, so I top stitched making sure I cought the seam undernieth whilst stretching the fabric.
I also unpicked the gathering as that was all in place and the stitched wern't needed.


So here is the lovely Alycia modeling the finished product for me as they didnt fit on the mannequin! 

 If I make these again I will use a longer elastic as this was all we had, I would also like to try a different techniqe with adding the waist band.
If I make these to wear I will probabily make them with a little bit less volume to make them slightly more wearable.


I think I would like to make them again from this fabric ^^  but im not quite sure yet.

Thanks for reading!! I hope you liked this post!

What fabric do you think I should use??

Jenny xxx

Related Posts Plugin for WordPress, Blogger...