This week I just finished manufacturing a shirt apart from the buttons and button holes, her I am going to share with you how I manufactured my shirt.
First I placed and pinned my pattern pieces onto my fabric and then cut them out, I also cut out interfacing for my cuff, button stand, collar stand and collar.
I then ironed on my interfacing to the button stand and folded it over, I then top stitched over the button stand. (the image above is my button stands)
Next I sandwiched the back shirt piece to my yoke pieces and added a mini box pleat in the centre of the back piece sewed them together. Really the box pleat should have been sewed closer together but that's a lesson learnt for next time.


I then sewed my pocked by sewing both pocket pieces together(right sides together) and leaving a small gap in the stitching to tun the picket inside out, I then cut the seam allowance in half to reduce bulk and then bagged out the pocket and sewed the pocked onto the right front shirt piece over the chest area.
I then sewed my two front pieces to the back shoulder and over locked the edges.
I then ironed on the interfacing to the collar, placed them right sides together and sewed a 1.5cm seam allowance, then I cut the seam allowance in half to reduce bulk. After that I bagged out the collar and pressed it.
After I pressed the collar I sandwiched the collar between the two collar stands and stitched in place 1.5 seam allowance, I also cut notches to give the collar ease when sewing.
Then I started to attach the collar to the shirt pieces by sewing one side of the collar stand to the top of the yolk pieces and then I folded over the other side of the collar stand and top stitched to give a neat finish, I then ironed the collar and collar stand.
Next I worked on the sleeve vent, First I sliced up the sleeve vent on both sleeves and then cut 2 strips of bias binding, I then attached the wrong side of the fabric to the bias binding with a 1cm seam allowance, I cut the seam allowance in half and ironed the bias strip over for a neat finish and top stitched.
I then sewed the sleeves to the shirt by attaching them at the shoulder first and over locking the edges, I then sewed attached the front and back of the shirt by sewing under the sleeve and then sewing the sides together, after that I pressed and over locked.
next I ironed on the interfacing to my cuffs and folded over 1.5cm on the top edge of 2 cuff pieces, I then top stitched 1cm distance from the edge. After this I placed the top stitch side of the cuff to the other untouched side (right sides together) and i sewed 1.5cm seam allowance on the sides creating this shape[ so that there is a gap in the middle, I then cut the seam allowance in half and bagged them out.
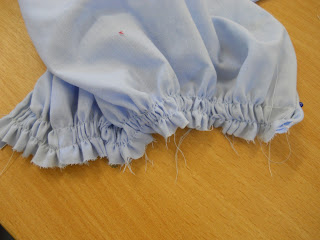
To sew the cuffs on I first ruffled the edges of the sleeves by sewing 2 stitch lines 1 under 1.5cm and 1 over 1.5cm seam allowance, I then Pulled the top threads and pulled the fabric down the thread to create ruffles.
I the sewed the longer side of the cuff too the sleeve 1.5cm seam allowance and then I pulled the top half over and tucked the ruffled edge in inside the cuff.
After I tucked the ruffles in I top stitched over the edge to give a nice finish and the I unpicked the longer row of stitching used to create the ruffles. This was the last step I did as I couldn't sew the button holes.

 This is the finished shirt without buttons, I feel that I did well making this shirt however it would have been nice to have finished it sooner as I found that I got irritated after taking so long. I'm really glad that I have learnt how to manufacture a shirt like this and now I definitely understand and appreciate how much hard work goes into manufacturing a shirt like this.
Here are some images of my friend Modelling the shirt and skirts that I have manufactured.
Thanks for reading! I hope this post was use full!
What do you think of my shirt??
Jenny xxx


2 comments:
it came out great!! Congrats!
XO Jannine
http://FashionistArg.blogspot.com
wow, i like it! you did it great...and i imagining it with my pants.
Post a Comment