Saturday, 31 December 2011

Bargain Jewellery!

A few months ago me and my friend discovered risingtaste.com via blog stats and email, we were quite sceptical about risingtaste as you should be with new online shops. But nonetheless we went and had a look and found some of the cheapest clothing and jewellery so I decided to buy some jewellery ready for Christmas, and they arrived a few days sooner than expected.

 First I bought this necklace for $3.44
I fell in love with this when i first saw it on cute little strawberries but I was gutted when I found out that they only ship to Singapore!

I also bought this for $3.44
It looks really pretty in the light, one of my new favourites!

Finally I bought this bracelet for $0.99!!!
I've wanted this bracelet for a long time and I was going to buy it for £3.99 at a different website but when I saw this it made my Christmas!

Thanks for reading! What do you think of my jewellery and rising taste??

And if I don't post before new year then
Happy new year!! I hope 2012 will be good to you :)

Jenny xxx


Tuesday, 27 December 2011

DIY : Shirred Maxi Skirt

So I've finally had the chance to make my maxi skirt, this is really easy to make and it shouldn't be to expensive to make depending on your fabric. For this you will need to have a sewing machine and this will require shirring, if you don't know how to shirr then here's a link to the video I learnt from : http://www.youtube.com/watch?v=EU9ZL0kMV_c

You will need:
  • 2 different fabrics (I used chiffon and a thin cotton) remember you fabric must be at least  waist measurement + 0.5 x required length
  • Gold or Silver closed zip any length you like
  • Sewing machine
  • Matching thread (to fabric and zip)
  • Elastic/shirring thread
  • Material scissors


Step 1

Make sure your fabric is the right size, mine is 1.5m by 1m that is wide enough for my waist and long enough to touch the ground. if you wan a shorter skirt then you can cut it shorter.

Then hem one edge of both of your fabrics (the longer edge)


Step 2

Thread your machine for shirring and place your  fabrics wrong sides togther on the edges where you hemmed and sew a line of shirring, any width you like, I used roughly 1.5cm. Remember to stretch the fabric tight when sewing a new row.

Then sew about 11 more rows of shirring, you can do more or less as long as they reach your hip.
(This is very tidious but its well worth it)


Step 3

Fold the skirt in half right sides in and sew them together untill the end of the shirring. Then sew the inner layer first and the outer layer second, the skirt will have more movement this way.


 Step 4

Next cut the bottom of the skirt so its all the same length and hem the edges of both fabrics.


Step 5

In this case the zip is for display only but you can make it functional if you want. Sew the zip on the seam be sure to match it with the top if the skirt, you can trim a bit off if you like.

Give your skirt a good iron and now your skirt is done! Simple and quick, It might not be exactly the same as the origional but its pretty close. I'll post an outfit of the day with this skirt as soon as I can.

Thanks for reading, I hope you have fun making this skirt if you decide to make it. If you have any questions then feel free to ask!

I hope you had a great christmas!

Jenny xxx


Thursday, 15 December 2011

DIY: Deco Den Compact

                                                                                                                Deco Den is a really nice hobby
and something fun to do when your bored and its quick and easyThis is more of an example than a tutorial, as I can only really show you an example of what you can do with your embellishments and give you some tips, that way you can have any design that you want on your make-up case or pretty much any plastic cover.


First if you cant find embellishments that you want then a good shop to get them is : http://fullmoon07xxx.ocnk.net/ (definitely recommend this onlineshop)
Otherwize you should be able to get them from a craft shop.


You will need :
  • Embellishments
  • Glue (Do Not Get Fast Drying Glue)
  • Something to decorate (e.g. Phone case, Compact case, jewellery box...)
  • (Optional) Tweezers and Q-tips.
Step 1


Figure out what design you want to create. Once you know where you want everything place your biggest pieces down first and then glue them down, this will be easier when filling your smaller pieces. (for bigger pieces you can glue the backs and then stick them down.)


Step 2


If you have lots of different sized embellishments then keep gluing them down (remember big to small). If you have embellishments similar to mine then stop when there too small to place with you fingers, that way you wont get covered in glue.


Step 3


Next add the smaller pieces, first glue the surface eavenly and then you can place them down with a pair of tweezers, this way is a lot faster and less fiddly.
(you can use a Q-tip to spread the glue in smaller areas)


Step 4


Fill all the spaces you can with your small embellishment it will look better to fill as much of the cover as possible, unless its part of your design to have some of the cover exposed.


Step 5


Finally fill any small gaps with emaller embellishments (I used nail art Rhinestones)
Then leave your Deco Den case to dry over night (try not to touch it)  


Thanks for reading, I hope you liked this post! If you have any questions feel free to ask, and if you tried this or done this before how did it go??

Jenny xxx

Tuesday, 13 December 2011

A Trip To The Garden Centre

Recently I went to our local garden centre with my dad, I only found out not long ago that they now have a craft shop and I was quite annoyed than none of my friends had told me about it sooner as there aren't many local craft shops.

They have a lot of really nice things this time of year so I thought I would share some pictures (I felt like such a tourist taking pictures of everything)


This is a Dress they have from the Philippines, its almost £400 but it looks amazing especially up close.

I got 3 packs of embellishments for 99p each, I'll be using these in a DIY later this week.


This trip has definitely helped me to get into the Christmas spirit. Wheres your favourite place to go this time of year?

Jenny xxx

Sunday, 11 December 2011

The Innocent One

These past few weeks we've been doing styling shoots in college, I just wanted to share the independent shoot that I have done at home with my friend Shelby. 

Originally we were given the word "secret" however I found it easier to use innocent as the theme instead.  For this shoot I dressed her in white (unfortunately we didn't have white leggings) I also kept her make-up quite natural and I fluffed up her hair clipped in some pom poms and a ribbon.

The Idea for this was to have an innocent girl as the main object and for her to look quite angelic which is why I used a partial blur and gave her a dreamy glow, I also added some glitter and stars that ended up looking like snow which was fortunate as I wanted to have a shoot of her playing in the snow but we haven't had any snow yet.

Here's the pictures:

I hope these look pretty innocent, any feedback would be great!

After we finished we thought they looked like Christmas cards, so we made one:


Merry Christmas! 

Jenny xxx

Wednesday, 7 December 2011

Who's Met William Tempest?

Last week on Friday William Tempest came to visit our college and talked to us about his career and life in college and afterwards as he was a fashion student at Mid Cheshire college several years ago.
If you dont know who William Tempest is he is a British Fashion designer from Cheshire (were i'm from!) He's also attended The London College of Fashion and worked at Giles Deacon in London and Jean Charles de Castelbajac in Paris.
During his talk we had a chance to ask him questions but not many did and as I was a bit star struck and scared to say anything so I held back.
 
However, after the talk he went through his portfolio. (which looked amazing) 
His portfolio has definitely made me want to be more creative with my work and I have learned how effective simple things can be, such as embelishments, the media you use or just the colour.

 I have also learned to concentrate on the smaller details, like the shape of a neckline or what material to use as sometimes they can make a big difference to your garment or work. 

What will I take from his visit?
Ans: I will try to gain more experience in the field that I wish to work in and I have now become more aware of what I am attracted to and can hopefully condence this into a style of my own.

Here's his website address: http://www.williamtempest.com/


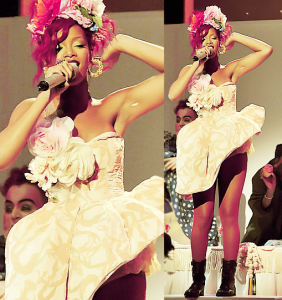
He has worked with many celebrities and a lot of them wear his dresses regularly including Emma Watson, Rihanna, Victoria Beckham, Leona Lewis and so on...


Rihanna X Factor


Thanks for reading, I hope you liked this post. What do you think about William Tempest's work??

Jenny xxx

Sunday, 4 December 2011

3 Weeks Till' Christmas

This is just a quick post to let you know whats coming up this month, I always feel quite crafty when winter comes and I really do need to learn how to knit but there will be more DIY posts this month including the Crinkle long skirt from a previous post.

 There will be other Christmas posts, after the 15 there will be more frequent DIY posts. For now I wanted to show you my Christmas tree that was put up on Dec 1st, its a tradition that my dad has done since he was a child and one we do every year.


This year we got a white tree and decorated it in blue, as our tree isn't very big we also bought mini baubles.


Thanks for reading, I hope you liked this post
Have you put your tree up yet? what does it look like?

Thursday, 1 December 2011

Making My Millitary Skirt

Over the past few weeks we've been making skirts from our skirt blocks, the current skirt (millitary skirt) now include a box pleat, kick pleat, a yoke, and a facing.

  I still haven't finished but I don't want to hold this post back any longer; Here are some images I've taken so far of the process.


The above photo shows my fabric folded in half and my paper patterns pinned ready to be cut. From this exercise I learned the importance of the grain line. If I did not follow the grain line I would have a twist in my garment. 

The above two images show the front and back facing for the skirt, on the right I have ironed on interfacing. Interfacing strengthens the fabric, in this case it will hold the waists shape. 

This image shows how I constructed the box pleat on the front skirt. Note, notches are important here.

In this image I sewed the yoke on to the front piece. To finish it I top stitched along the yoke line, I found this quite tricky as the fabric moved slightly under the machine foot.

This is a close up of the yoke.

These are the two back pieces with the yokes already attatched

I then had to sew in the invisible zip making sure my yoke lines matched up. To do this I sewed down one side of the zip and pinned the other side to where it matched.

This shows the kick pleat. This looked more difficult to construct than it was.

This is the front and back pieces sewed together on one side.

I've gotten a lot further than these pictures now and I'm really close to finishing at the moment its really long and comes past my knee's, It really starting to look like an Aircadets uniform skirt.

I will be sure to do another post once I've finished my skirt and I can safely say I probably wont be wearing it wont be wearing it.

Thanks for reading, I hope you liked this post. Have you ever made a skirt before? How did it turn out?

Jenny xxx
Related Posts Plugin for WordPress, Blogger...